Saturday, January 12, 2013

2013 Summer Workshop Schedule

Join us for a wonderful art experience painting the San Juan Islands. All levels are welcome. July and August are creative days for all levels. September's 2 day workshop is geared for more experienced artists. We work out on location at beautiful sites around the island, meeting first at Funk & Junk Antique and then heading out to beaches, farms, or private homes. Dates in 2013 will be July 14, Sunday, August 11, Sunday and September 13, 14, 15. We'll start Friday Sept 13th at 6 30pm in the evening at my studio on San Juan Island. Cost for one day $100, Cost for 2 day September workshop $225. Sign up with Annie Howell-Adams at 378 2638 or 1 866 374 4272 toll free I will be working in oils, other mediums welcome. Oil Material list here.
Starting the morning making color wheels, mixing color
Our beautiful location on the west side of San Juan Island.
Barbara's pastel painting of Madronna trees growing out over the water.

Sunday, March 4, 2012

2012 Summer Plein Schedule Here


Dates for this summer 2012 are July 13,14,15
August 10,11,12
September 7,8,9

Scroll down to older posts on this blog for demonstrations and suggested materials
Call to register and for questions about materials. Annie at 360 378 2638

Tuesday, March 16, 2010

Summer Art Workshops


Join us this summer,to
Paint the San Juan Islands!


Experience the beauty of the island while
expanding painting skills.


Summer Plein Air painting workshops will cover the basics of working on location. Friday evening will be devoted to a demonstration, painting issues and time for questions about materials or other painting aspects. On Saturday and Sunday, artists will set up and paint on location. Each day a different environment, artist will create 2 paintings. Each artist will get personalized one on one instruction through out the weekend. There are endless possibilities for painting with San Juan Island's maritime and pastoral views.
Years of teaching drawing and painting combined with her love of painting her island home, makes Annie's painting workshops a wonderful creative experience. Islanders will experience the island in a new way.
Scroll down for online painting demonstration along Cattle Point Road, looking to Mt. Dallas..


Cost $225 per workshop
Click on sidebar for materials list for workshops
Overnights available at Nichols Street Suites


Sign up at Funk and Junk Antiques in Friday Harbor, email at anniehowelladams@gmail, or phone at 360 378 2638 in Friday Harbor.

Wednesday, September 2, 2009

Out on location.....Online Painting Demonstration


Photo of the view out across to Mt. Dallas. Deciding to concentrate on far view, eliminate pond, would need much bigger canvas to include it.

Laying in the sketch, drawing shapes with my brush and thin paint, working on plain white canvas.

Starting in the back, establishing values for the farground.

Darken area by fir trees, imbedding fence and forward single tree into paint surface.

Adding yellows and reds to foreground. Establishing hint of 2 vanishing point in foreground to help flatten foreground over natural terrain.

Reestablish sky-holes in dark fir trees, continue warming up foreground, get shadows shapes into forward single tree.

Make sure darks are interesting, adding dried grass to fenceline, lively brushwork in foreground.

Cutting back sky hole shapes in fir trees, really warming up under painting for foreground. Stand back and see what painting needs......Check edges, soft and hard edges....

Adding lighter values forward to help add some contrast. Lighter values on grass and single tree. Worked up into sky. Don't want to get to fussy with grass brush strokes. Finished for now, sign into the wet paint.


I start off at a new location sketching, looking for a view I like. Sketching helps me to simplify what's out there. I can make some compositional decisions, cropping and positioning things. For this 16" x 20" canvas, I took pictures along the way to show one way to develope a painting. I typically start in the back and paint forward in a landscape painting. This was painted over a 4 hour period, luckily the light stayed consistant. My palette had very few colors, french ultramarine blue, cadmium yellow medium, cad red, a little terra rosa, and white. Basically one of each primary and everything was mixed.

Monday, July 13, 2009

Setting up, including setting up a palette.

Part of the trick of outdoor painting is figuring out what to take with you. I try to take a striped down painting kit, something I could hike with, away from my car, to get to that good view point. I load my supplies in a basket. In the other hand, I carry my french easel with a canvas snapped into the easel. Usually at a new location, I walk around first just to get the lay of the land and figure out where to set up. If I still haven't found that "perfect spot" I sketch out various ideas in quick loose thumbnails.
Sketching a thumbnail is useful for many decisions about the painting: what size canvas, which direction, overall composition, values, and especially what to simplify. It helps get your eye tuned into the scene you are about to paint. Sometimes I like to do a small quick color study before beginning a large painting.
A family was out enjoying the beach, they added life to this scene. 8" x 10"

When I squeeze out my paint, I do the same basic set up each time, warms across the top, cools along the left side, white in the upper right corner, medium in the lower right corner. This gives me a huge mixing area, and the memory of where colors are located when mixing on the fly.
It is possible to paint with only 3 tubes of paint. Here in the San Juan Islands, I would choose Cad. yellow medium, cad red light, and french ultramarine blue, along with white. This gives wonderful olives and subtle purples, perfect for our northwest scenery. If I would like to expand my choice of colors I squeeze out a second version of each primary, Cad. Yellow medium + cad yellow light a warm and a cool yellow. For reds, Cad red light + alizarin crimson. If I would like to add more variety of reds, I like to add a magenta and a wonderful earth color, terra rosa. For blues, Ultramarine a warm blue, and a cool blue. That choice of cool blue seems to vary a lot, sometimes cerulean, manganese, or prussian. Earth colors are useful too, raw sienna and yellow ocher are my preferences. Keeping paint organized and along the edges, gives a large working area, where all the color mixing action is. When you paint with primaries, you need to be able to mix a range of colors and values.

By the time I start painting, many question have been answered, I can concentrate on just the act of painting, brushwork, edges, shapes, and enjoying the process.
San Juan Shore, 16" x 20"

Tuesday, February 24, 2009

Pull up a stool and let's talk about getting started


*
*
*
*
*
*
*
*
*
*
*
*
*
*
*
*
*
*
*
*


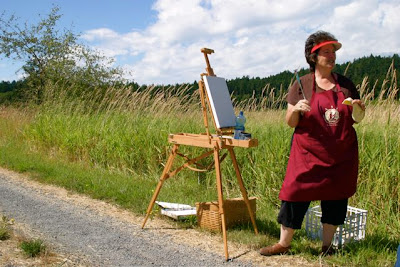
What to bring to the workshop? Load supplies into a basket or 5 gallon bucket for easy transportation to a painting site.


sketchbook and pencils for sketching ideas and thumbnails.

french easel, ideal. I prefer the larger version. With a french easel an instant studio can be set up anywhere.

brushes, 3/4", 1/2" and 1/4 filberts are great, shorter bristle recommended. Palette knife...good for mixing, softening edges, and painting with. A slightly rounded tip with blade about 1 1/2 inches long and 1/2 wide is a good versatile size.

Palette, the stay-wet palette with the bright blue lid and 12 x 16" paper palette to lay inside. Paper palettes are handy on location, combined with the palette box.... easier clean up. If you are ordering online, see if gray palette paper is available.

Odorless mineral spirits, OMS, small bottle.
For medium, I like liquin, galkyd, or galkyd-lite by Gamblin. We will use galkyd as a glaze on our second day.

Rags, old towels or t-shirts cut up are great. If you have the time, throw your newly cut rags in the wash to get rid of the lint balls.

2 or 3 small sized canvases these are all good sizes: 9 x 12,11 x 14, 12 x 16" is about the maximum size for a plein air. Linen or Canvas pad fine too.

Gloves, & Apron.
Lunch, water bottle, stool if you like to sit.

Oil Paint:
I paint with a limited palette on location. With just primaries, it's possible to mix any color. Warm and cool of each primary,2 reds, 2 blues and 2 yellows, and a couple of earth tones, with white will be the basis for any color!

Red: Cadmium red light, pick this if you only pick one red.make sure it's red light.
Alizarin Crimson. good mixing color. One more color to add would be a magenta or what is called Quinacrodone Magenta. It's difficult to make clean purples out of Alizarin.

Yellow: Cadmium Yellow Medium and Cadmium Yellow Light.Pick yellow medium of you only pick one.

Blue
: French Ultramarine Blue, a warm blue if you pick one blue. For an additional cool blue,there are a lot of choices....Manganese blue, mild... Thalo blue, windsor blue, both strong pigments.

Earth colors: raw sienna, very good. Yellow ochre and umbers.
White: I like Gamblin's blend of titanium and zinc. Permalba brand good too.

In plein air painting, you don't need a lot of colors, less can be more.This list gives you a warm and cool of each of the primaries.

We will have a color mixing session to understand the color wheel and how to achieve great results and color control with a limited palette.


The cost of the workshop is $225.
Limit the size of the group to 15. Artists of any level may join.

If you'd like to work in another medium, that's fine, and if you have any questions about what to bring, call me.

Please call with any questions, my toll free number is 1 866 374 4272
locally at 378 2638, or email: anniehowelladams@gmail.com
We have overnight accommodations above out antique store, Nichols Street Suites.
I hope you can join us!!
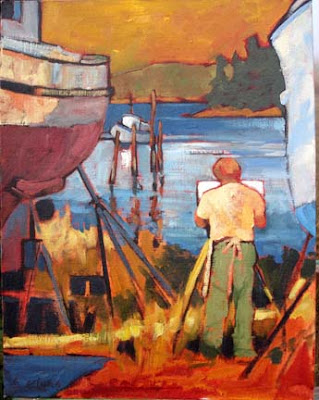
Demonstration during the Workshop, Wicker Chairs on the Front Porch, from Sketch to Final


Initial sketch, simplifying the view.

Painting with water and black gesso onto canvas. Dries FAST.

Transparent pigment & galkyd medium as a glaze over gesso.

Start in with regular oil paints, having let glaze set up for 10-20 minutes.

Final, with small bits of black gesso and glaze showing.

I have found an interesting sight, the chairs on the porch. First I do a loose sketch to familarize myself with what some of the main elements are. Some compositional decisions are forming already, what to eliminate, what to emphasize.

I like to demonstrate an unusual painting technique of laying in with black gesso, glazing with colored transparent paint, then painting with regular opaque paint. This give a quick build up of layered information, which is rather great for plein air painting. After the sketch, I loosely paint in my composition on the canvas. 98% of this will be covered up, but it's a nice "road map" for my painting.
Next I mix up a glaze with a transparent pigment and medium,only a tiny amount of pigment necessary. Cover the entire canvas, gesso and all.
While the glaze is getting a little tacky, I set up my regular palette with oil paint. This takes me a few minutes, and so it works out nicely to let the glaze set up a little. I can even get started mixing colors ahead.
So, the painting is started, and I haven't even put on any paint.
I often paint from back to front in plein air painting, I can get a good sense of overlap, without fussing with my paint. By laying in all the supporting cast a head of time, I know how far I can push the focus of the painting with color and contrast,in this case, at the chairs. At the end, there is very little black gesso showing, but it adds a nice layered look, for a painting that was done fairly quickly on location.
Demonstration from Pearl Island, a small island near Roche Harbor.
This sequence show, 1. the thumbnail sketch 2. Laying in with black gesso 3. Transparent glaze 4. Using opaques 5.Final painting